Purse and Scarf Hanger

Do you hang your purse from one of those coat hooks? I do and I can’t even count how many purse handles I have damaged by doing that and I didn’t even realize that the hooks were causing the damage. For my last birthday my in-laws spoiled me with a gift certificate that I used to get a very nice purse. I started to hang this purse on the door knob in the laundry room and after a few months I realized that the purse handles still looked like new and that’s when the light bulb went off. Using the door handle as a purse hanger wasn’t very practical, so I decided to make a new purse holder with the same shape of the door knob.

Purse and Scarf Holder

What you need:

  • A thick piece of wood
  • A fence post cap
  • Paint
  • Sponge Brushes
  • Sand Paper
  • Curtains rings
  • Hot Glue Gun
  • Color String
  • Metal Hooks

I wanted a fun bright and girly design.

Purse and Scarf Holder

I used my Cricut to create a Choose Joy Stencil.

purse-and-scarf-holder

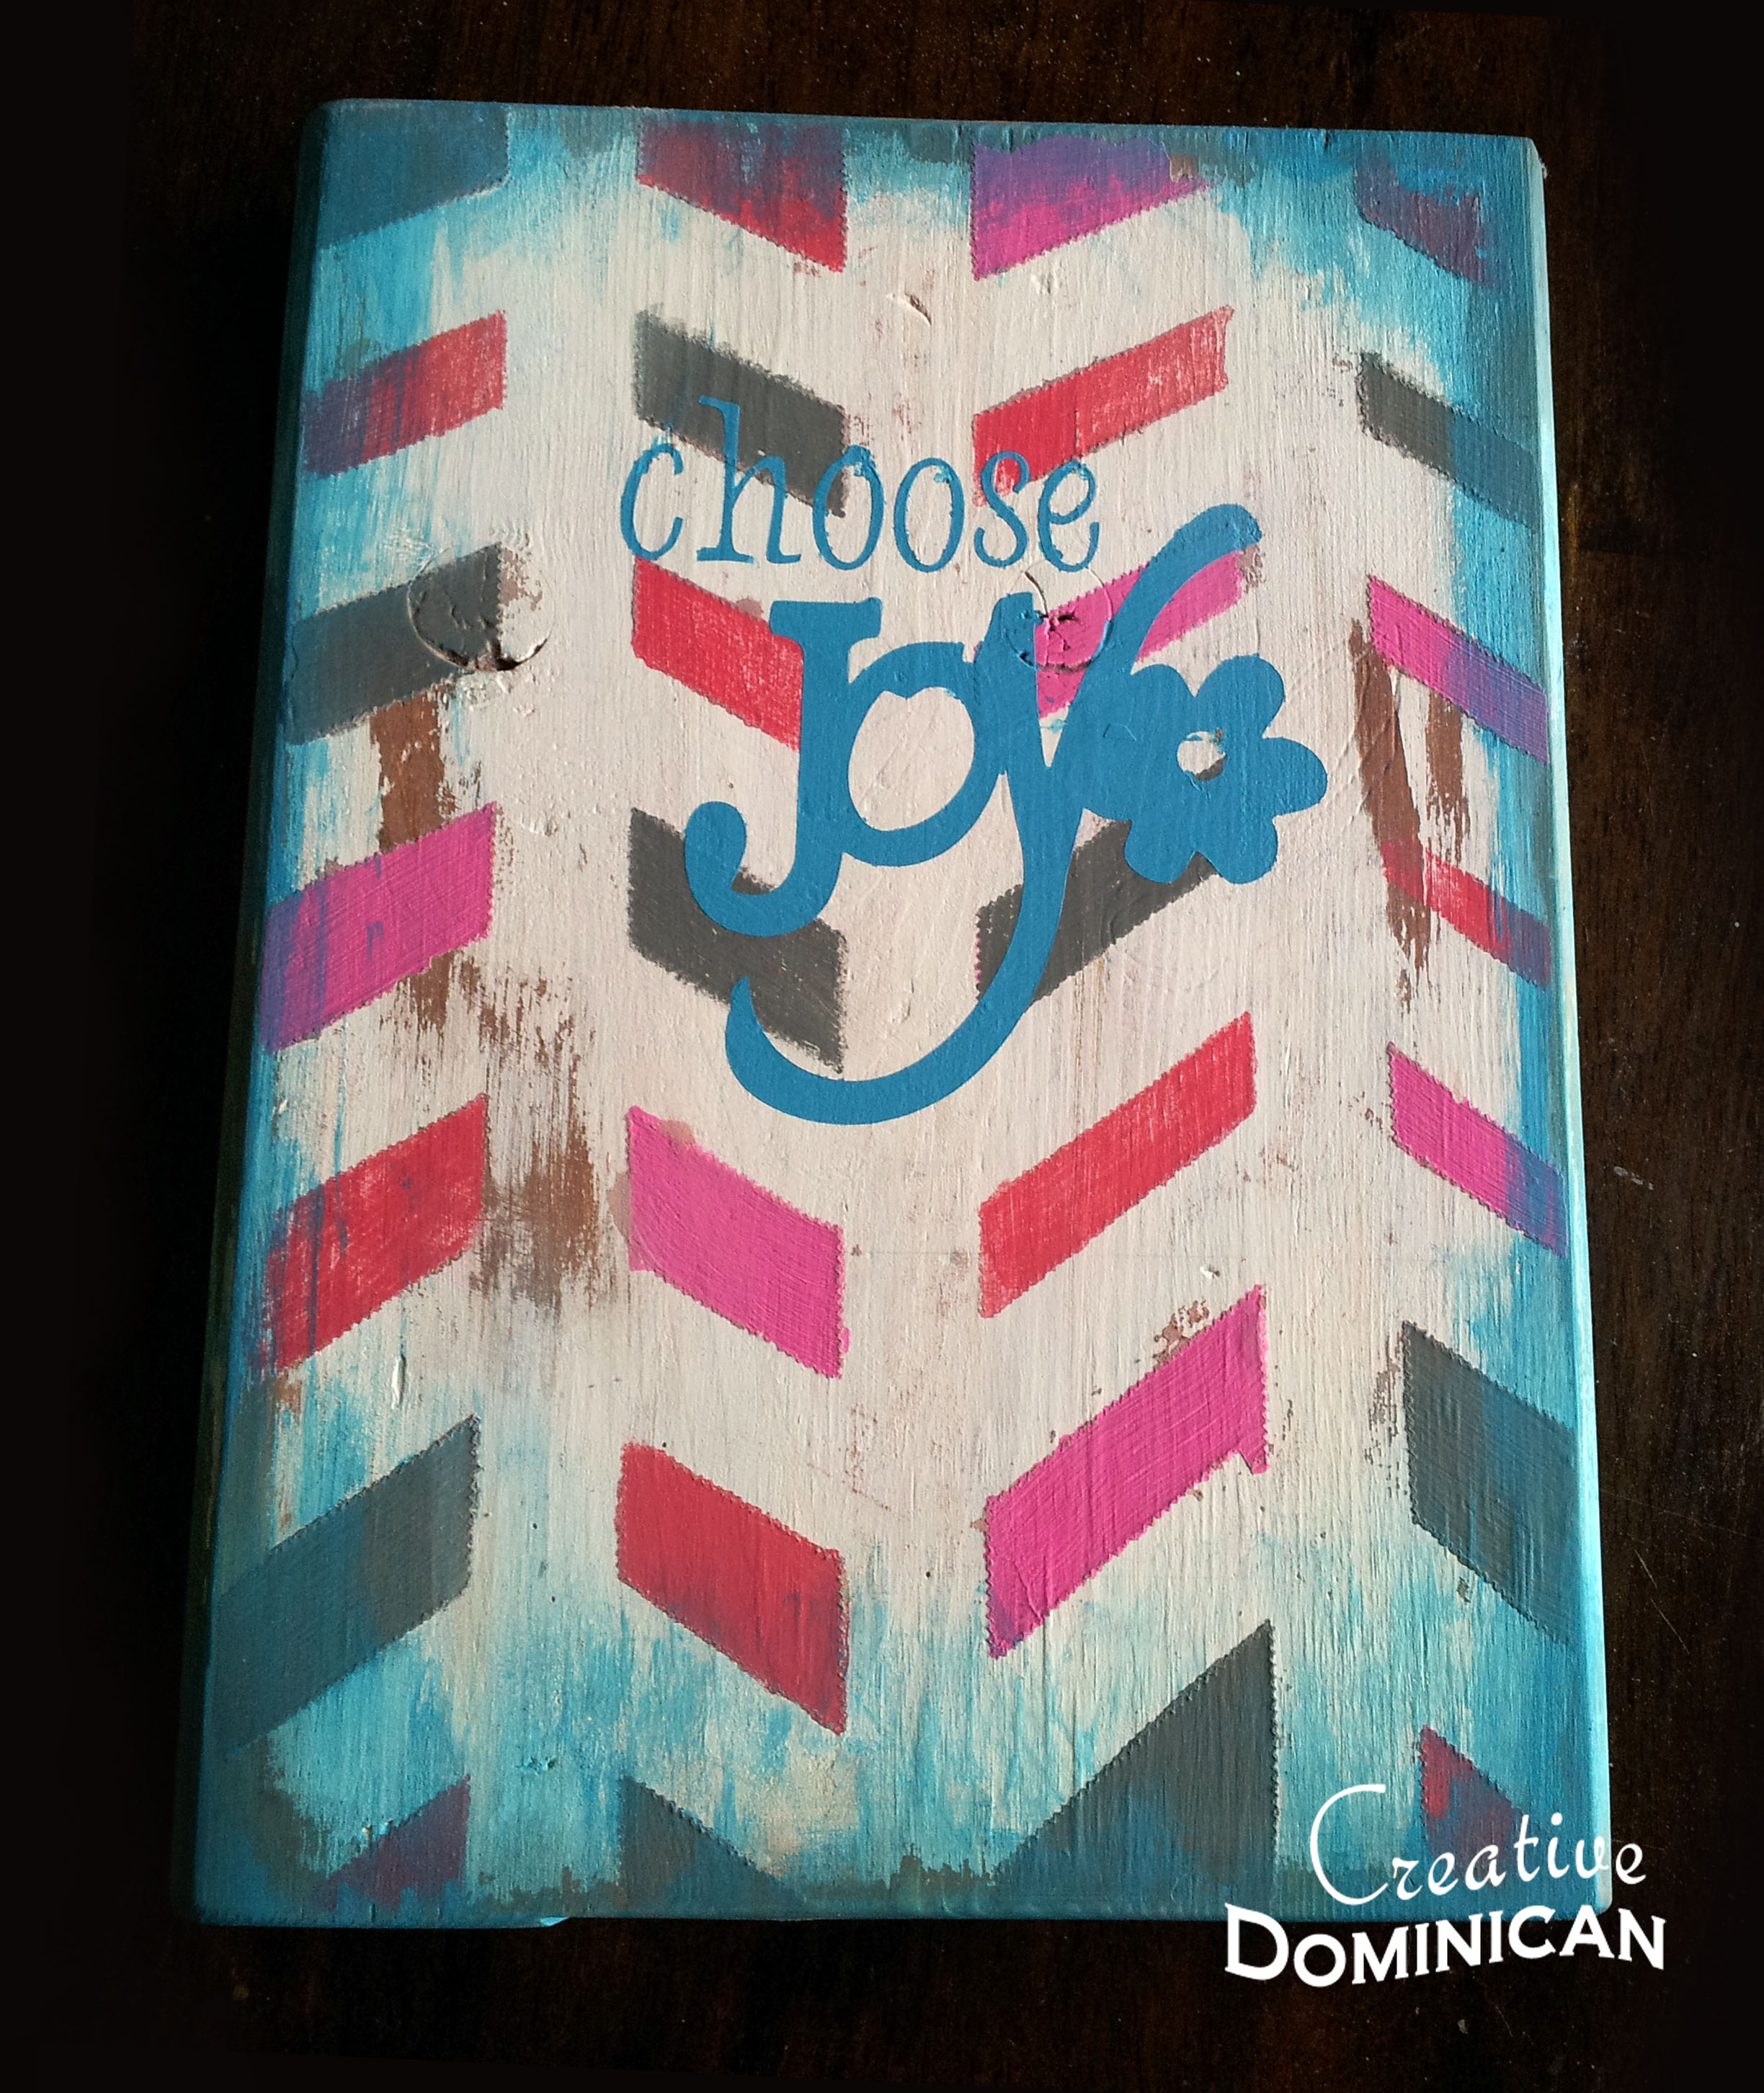
I added a cute little button to the flower and traced the words with a black marker to make the words pop a bit more.
purse-and-scarf-holder8

I put the fence post cap through the bottom of a plastic cup for an easier painting and drying process.

Purse and Scarf Holder

Pre-drill a hole to screw the post cap right in.

Purse and Scarf Holder

Purse and Scarf Holder

Originally this was only going to be a purse hanger, but I had to find a new solution to my Pinterest fail scarf project. You know, the one where you use curtain rings on a hanger to hang all your scarfs. Great idea, but mine ended up hanging all to one side which drove me crazy.
pinterest-fail

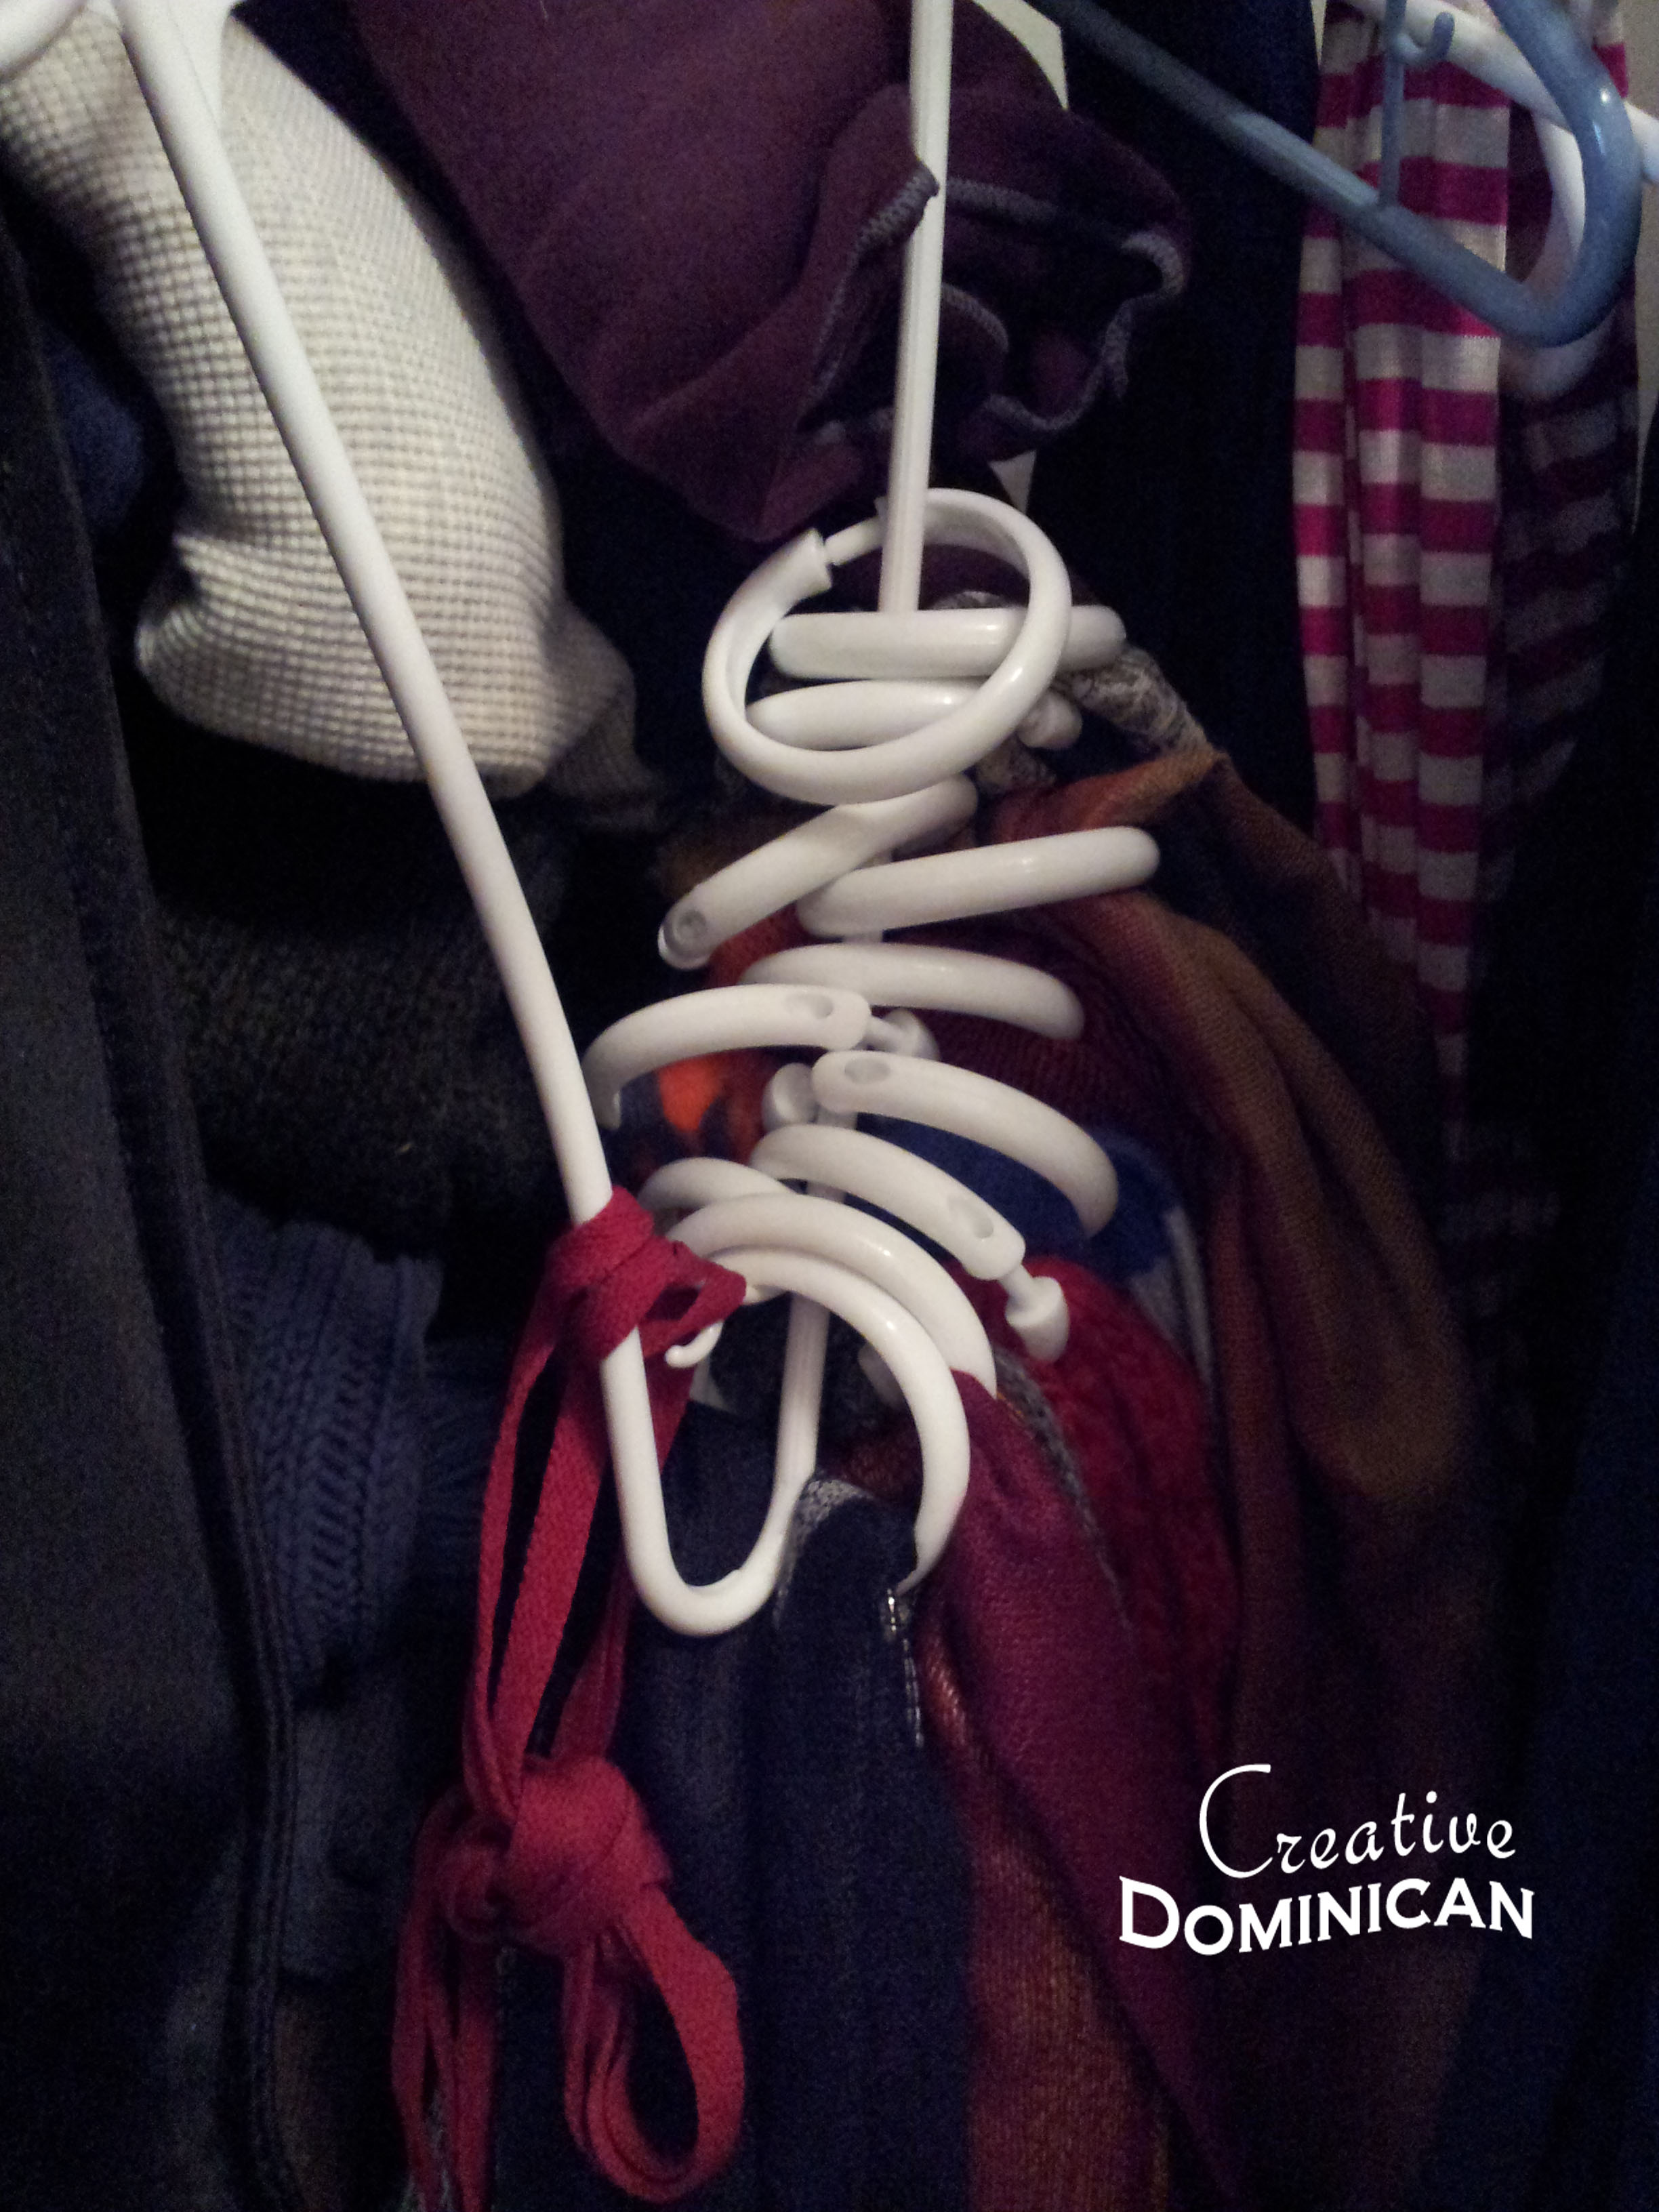
Stephanie from Simply Dream & Create did an awesome guest post of a Creative Scarf Hanger over on Titi Crafty and I thought that was the perfect solution to my scarf problem. So I implemented that I idea to my purse holder.

I played with the positioning on of the rings till I found a layout I liked. I a hot glue gun to set the rings in place.

Purse and Scarf Holder

Purse and Scarf Holder

I added some pink string.

Purse and Scarf Holder

I drilled some holes to the bottom and added 3 hooks to attach the rings.

Purse and Scarf Holder

Purse and Scarf Holder

Purse and Scarf Holder

Do you like it? Could you use one of these? I love how this turned out. Thanks for stopping by.

Hugs,

Beca

Linking up at:
Titi Crafty | DIY Show Off | A Stroll Thru Life | Home Stories A to Z | Lil Mrs Tori | VMG206 | Twinkling Trees | Elizabeth and Co. | Homework | Blackberry Vine | The Winthrop Chronicles | Him and Her | Our Home away from Home | Sugar Bee Crafts | Monday Fun Day | 36th Avenue | Ginger Snap Crafts |Sew Much Crafting | My Uncommon Slice of suburbia | DIY Dreamer | Lamberts Lately | 52 Mantels | Live Laugh Row | Stone Gable | Krafty cards Etc. | The Shabby Creek Cottage | Tatertots and Jello | 504 Main | Liz Marie Blog | French country Cottage | One Artsy Mama | Funky Junk| Simply Dream and Create | Living Better Together | I Heart Nap Time | A Night Owl

DIY Farmhouse Bed

OK I can’t take much credit for this one because it was built by Mr. Creative Dominican with a little help from our oldest, but I did all the begging and the painting to get this done and that counts right? I was shocked that the hubs agreed to do this project when I approached him with Ana-White’s Farmhouse plans. It was a bigger shock when we went to the store to get the wood and he wanted to get the higher quality and more expensive one (he is totally getting the DIY bug LOL) I really wanted the cheaper cracked and imperfect wood for a really country farmhouse feel. I originally planned to distressed the heck out of it, but I loved it so much in plain white that I decided to skip the distressing.

At the time I wasn’t blogging much so we didn’t take lots of pictures of the process but I love how it turned out so I wanted to share.

DIY Farmhouse Bed

DIY Farmhouse Bed

DIY Farmhouse Bed

The first coat of paint was brushed on and that was a big yuck! I gave it a second coat using a foam roller and that made it soooooo much better. No brush strokes at all! I love it. Please ignore the ugly lamps and tables they will be gone soon (another project 🙂 ).

DIY Farmhouse Bed

DIY Farmhouse Bed

DIY Farmhouse Bed
I want to give a special thanks to my mother-in-law for the beautiful hand made quilt. I love it!.

Thanks for stopping by
Hugs
Beca

Linking up at these parties: Titi Crafty | DIY Show Off | VMG206 | Redfly Creations | Blackberry Vine | Crafty Confessions | A Stroll Thru Life | Homework | The Winthrop Chronicles | Lamberts Lately | Sugar Bee Crafts

DIY Dollhouse

So my little girl asked for a Dollhouse for her 3rd birthday and of course I couldn’t just go buy a house, I had to build one for her. You should have seen the look on the hubs face when I told him and of course this just made me more determined. I followed Ana-White’s Dream House plans except that I got a little excited about the build and added an extra floor.

DIY Dollhouse

The plans on her site list the total cost on this project to be around $200, I ended up spending around $50 total. My original plan was to have the hardware store make most of the plywood cuts for me (I was willing to pay extra for the cuts), but the guy said the best he could do was to cut it to fit in my van, boo. After walking up and down every isle trying to come up with a plan B, I came across some thick plywood pre-cut at 24″ x 24″ for $4.99 each and since the plans called for 24″ x 32″ I decided that 24″ x 24″ would work. For the walls I just used two pieces of 2×6 cut to 14″ and glued together.

DIY Dollhouse Materials

I cut 16 pieces of 2x2s at 24″ for the floor frames.

DIY Dollhouse

This was the perfect project to use my new toy and now favorite tool, the Kreg Jig.

DIY Dollhouse

Once my pocket holes were drilled I just attached the 2x2s to all 4 sides using screws and wood glue.

DIY Dollhouse

I added scrapbooking paper with Mod Podge to the walls and later a strip of white paper to the top and bottom to imitate molding.

DIY Dollhouse

I added some furniture made out of some scrap wood.

DIY Dolhouse furniture

DIY Dolhouse furniture

DIY Dollhouse
DIY Dollhouse
DIY Dollhouse
DIY Dollhouse

DIY Dollhouse

DIY Dollhouse

I made the walls a bit taller than the plans called for and at first I was thinking it was a mistake, but then I saw that Barbie liked to ride her horse in the house and I was glad I added the extra head space..LOL

DIY Dollhouse

I have to admit I was having second thoughts about this project and that was only because she kept saying she wanted doors and a pool with her house among other things. I was worried that she would have been happier with a house that had doors, windows and a working door bell, but when I saw her jumping up and down after she saw it I was glad I built it for her. She is already making requests for a TV, pillows, blankets and a video game room for the house so it will be fun to just keep adding furniture and things to it. We spent some time yesterday building and painting some additional furniture and I loved it. Next, I plan to add an elevator.

DIY Dollhouse

DIY Dollhouse

I hope you like it as much we do! If you like it, show some love by sharing it, pinning it, liking it or leaving a comment. I love comments! Follow my blog via the links on the right column or via Pinterest and Facebook to keep up with all my projects.

Hugs,
Beca

Linking up at: VMG206 | 36th Avenue |{wow me} Wednesdays | Lil Mrs Tori | Homework |The Winthrop Chronicles | Titi Crafty | Live Laugh Rowe | StoneGable