I was tired of looking at the ugly plastic bin I’ve been using as a toy box, but I didn’t want to spend money on an actual toy box. I decided to just give the bin a little makeover. It just took some wrapping paper, Mod Podge, burlap and decorative fence post caps to go from this:

To this:

Like it? I think it looks great. The bin is in my family room so I picked materials that would go well with my current decor, but the possibilities are endless.
Materials:
1. Bin
2. Fabric or wrapping paper. I used about a yard of burlap and wrapping paper I picked up at the dollar store
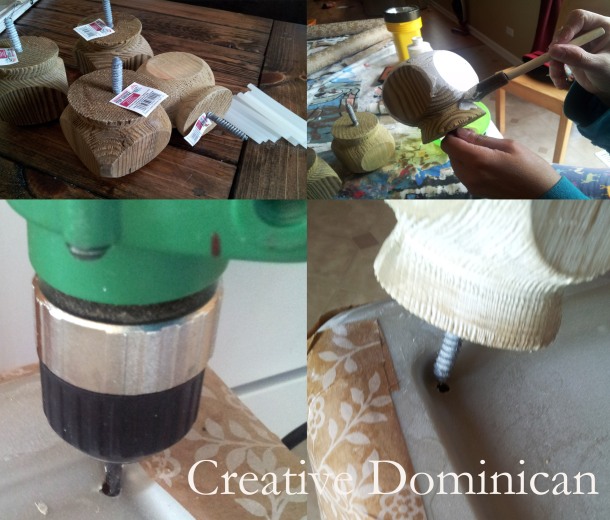
3. To keep the cost down I used decorative fence post caps as the legs instead of actual furniture legs. They cost about $3 each
4. Rope
5. Mod Podge
6. Hot glue
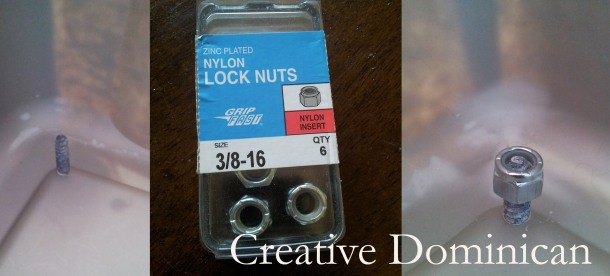
7. Lock nuts
I brushed the Mod Podge on the bin with a sponge brush working in small sections so I could attach the wrapping paper and keep wrinkles to a minimum. I still had to recruit a helper to hold the bin down for me. Isn’t he cute?

My bin had a bit of a curve at the top. In the picture above you can see that I made some cuts to the paper so it would bend better and stay smooth below the curve. After I had it nice and smooth I trimmed off the extra paper.

I covered the lid and the section with the curve with some burlap using my hot glue gun. Now it was time to attach the legs. Attaching the legs was super simple, I just drilled a hole and screwed them right in. They are on super tight, I got this idea after putting together one of my daughter’s ridding toys where the screws just went right in to the plastic.
The screws that poked out inside were large and I was worried that they could scratch my little one if she decided to sit inside, so I added the Lock nuts to the top to cover up the pointy part and avoid any problems later.


Thanks for the visit!
Beca
So honored to be featured :


Linking to: Stone Gable| Not Just a House Wife | Home Stories A to Z | Craft and Repeat | Monday Fun Day | Lil Mrs Tori | Elizabeth and Co. | HomeWork | Blackberry Vine | The Winthrop Chronicles | The 36th Avenue | Ginger Snap Crafts | 52 Mantels | Lamberts Lately | The Shabby Creek Cottage | Live Laugh Rowe | DIY Show off | It’s Overflowing | VMG206 | This Silly Girl’s Life | Today’s Creative Blog | A Stroll Thru Life | Our Home Away from Home | French Country Cottage | Remodelaholic | Living Better Together | 504 Main | Tatertots and Jello | Liz Marie Blog | One Artsy Mama | Titi Crafty | Pink When | A night Owl | Weekend Wonder


Great idea!
Thanks Stephanie! Have a great day.
Wow I LOOOOVE this idea Rebeca, and I would never have said it was paper, awesome, when I first saw the pic I thought it was all fabric. It looks really good… it gives me lots of ideas to make around here with all the containers we have!!!! =D Awesome share!
Hugs and xoxo
Cami
Thank you soooo much Cami! It was a fun one to do and the possibilities are endless, I’m already thinking of doing the same thing to the one in my son’s room too. Thanks sooo much for the visit and sweet comment. I hope your feeling better.
Found you through Hometalk. I am SO doing this for my daughter. She has a storage box FULL of dinosaur figurines and Webkinz. I’d love to doll up a container to better suit her personality!
Hi LuAnn! Thanks so much for the visit. I’m so glad you liked and took the time to visit. Have a great week.
Awesome as always! I’m impressed!
Thanks Kerry! Your support means so much to me. {{{{hugs}}}}
This is so cool. I love it. What a fabulous idea and it looks totally amazing. Wow, I am so impressed with your creativity. Thanks tons for joining Inspire Me. Hugs, Marty
Thanks for the visit and sweet comment! So glad you like and I’m glad I found your site. Have a great week!
Beca
Awesome. I’ve pinned this. It would be a perfect organization solution for our family room!
Thanks so much Emily! Have an awesome week.
This is an incredible idea! I’ve been racking my brain trying to come up with a way to “hide” the toys in the living room – and I think I just found it! Yay! We’ll be featuring this over at Someday Crafts tomorrow!
Thank you Miranda! So glad you liked this and thanks for the feature. I’m so honored!
Wow!! I, too, thought you used fabric to cover the whole box….love that wrapping paper!! Without the lids, this would make cute laundry hampers for my girls’ rooms and so coordinated to their styles!!! I have a couple of these boxes that got damaged when we moved that I could just duct tape and cover up. Score!! Thanks for the idea!! I found you through Inspire Me Link party and now am your newest follower by email and on pinterest.
Awesome! Thank you Stacey. The possibilities on this are endless. I’m even looking at all my plastics bins now and thinking of re-doing them all..LOL. Thanks so much for the follow! I hope your having a great weekend.
Wow, that is impressive! I love how it looks! And you made it look so easy!
Thank you! It actually was very easy 🙂 So glad you liked it. Thanks for the visit and taking the time to comment.
I found you on the blog hop and I think your idea is genius! Where were you when my boys were young? lol
I look forward to following your blog and getting to know you better!
LOL Thanks Jan! Thanks so much for the visit and a huge thank you for the follow. Have an awesome week.
Love it…it does look like you used fabric!
Thanks Krista! So glad you liked it. I do love this wrapping paper 🙂
Great makeover!!! Looks awesome! Thank you so much for linking up to the Tuesday To Do Party!!! Can’t wait to see what you share this week!!
Smiles!
Jami
The Blackberry Vine
http://www.blackberryvine.blogspot.com
Oh no, the pressure is on now! LOL. Thanks so much Jami I’m so glad you liked it and I’m glad I found your link party. Have a great week.
Awesome I’m in need of a toy box but don’t want to spend a lot if money. This is a great saving!!!
Awesome Miriam! So glad this project will come in handy for ya. Thanks for the visit and taking the time comment.
Pingback: Dressing Up a Plastic Storage Bin
Saw this on RoadKill Rescue – AMAZING!
Awwww thank you for clicking over and visiting! I’m glad you like it. Have a great weekend.
very creative
Reblogged this on charmcitycreativedesigns and commented:
Storage Bin to Toy Bin